XuiONE Tips and Tricks
XuiONE is a professional platform for OTT and IPTV services. You can capture, transcode, record archives, manage users, resellers, programme guides and deliver multi-protocol video (live and on-demand) to any part of the world. Each connection is monitored and detailed statistics are collected and stored to ensure your content is kept safe and secure from the public.
Service Commands
service xuione <start|stop|reload|restart>
Example: service xuione start
Generate License
After a new installation, the license will be generated from the setup page. This can be access via: http://yoursite.com:8080/accesscode
Each installation has a unique access code, if yours for some reason doesn’t work, try the Access Code instructions below.
If you’ve already installed and progressed past the setup page, but need to regenerate the license, or on a load balancer for example, try the below instructions:
- Visit the XUI Billing Panel, log in and Reissue your license (for Main server only). Load balancers can skip this step.
- Ensure your license number is in /home/xui/config/config.ini
- Run the following commands on the server via SSH:
- rm /home/xui/config/license
- sudo -u xui /home/xui/bin/php/bin/php /home/xui/crons/license.php
The license.php will output information about your license and whether it is valid or not. If this doesn’t work, and your license is definitely in the Reissued state, then you’ll have to contact support or post on the forum.
No Access Code
If you can’t access the admin interface, as you don’t have an access code or the access code you have doesn’t work, check /home/xui/bin/nginx/conf/codes/ to ensure there is a code that ends with .conf. If there is, try using this as your access code.
If there are no codes that end with .conf, or the ones that do are not for an admin interface login, then copy template to admin.conf and make the following changes:
- Replace #CODE# with admin
- Replace #TYPE# with admin
- Delete #WHITELIST#
- Enter mysql via your preferred method and run: USE `xui`; INSERT INTO `access_codes`( `code`, `type`, `enabled`, `groups`) VALUES (‘admin’, 0, 1, ‘[1]’);
- Run the following command via SSH: service xuione reload
- You should now be able to access the admin panel via: http://yoursite.com:8080/admin
Login Error: “You do not have access”
This error relates to the access code specifically, it means the access code you’re using is for a group that your user is not in. Make sure you’re using the right user, or the right access code. If you can’t access the panel because of this then use the instructions from the No Access Code section to create a new access code for admins.
MySQL Access Denied
If you’re getting access denied on the main server, you’re going to need to edit /home/xui/config/config.ini and change the username and password in the Encrypted section to match the credentials you were given when installing XUI, like this:
[Encrypted]
username = “username”
password = “password”
After saving, you can restart the panel and see if this has worked.
For load balancers, you can either follow the above steps or ensure that the main panel mysql is working then reinstall the laod balancer. There is also an option in Management -> Tools -> Quick Tools -> General that will regenerate mysql authentication for your load balancers. If this doesn’t fix the issue, the XUI mysql user doesn’t have permission to authorise external users. In which case you will have to ensure that the user does by granting the privilege, or allowing the load balancer IP manually. Either worst-case option here is an advanced procedure and may require external help.
Load Balancer Offline
Access the load balancer via SSH and run /etc/init.d/xuione stop then /etc/init.d/xuione start, this will tell you some information about what is wrong with the installation that prevents it from going online, it could be a mysql issue, it could be a license issue, or it could be something relating to libraries not being installed. Follow the trail.
Migration
In order to migrate your old database to XUI, a separate database has been created called xui_migrate which XUI has full access to. You will need to restore your migration SQL file to this database in order for migration to work.
You can restore the SQL file using the following shell command:
mysql xui_migrate < database.sql
You can migrate at any time by visiting: http://yoursite.com:8080/accesscode/setup
You can also manually migrate via SSH using the following command:
/home/xui/bin/php/bin/php /home/xui/includes/cli/migrate.php
If a failed migration causes issues with logging in, you can restore a blank database using the following command:
mysql xui < /home/xui/bin/install/database.sql
Reset Admin User
If you need to reset the admin user for any reason, you can run the following via mysql to restore user ID 1 to the username admin and password admin. Please change the username and password afterwards.
USE `xui`; REPLACE INTO `users`(`id`, `username`, `password`, `member_group_id`, `status`, `owner_id`, `date_registered`) VALUES(1, ‘admin’, ‘$6$rounds=20000$xui$eQfRsD2gsIUhoY5RnnYN82qiB5VeZTcHICQrFxXpa98J2R1454b6lzVHVjiJ.NP0gi0X3K7NXVgxeR1VhVhg61’, 1, 1, 0, UNIX_TIMESTAMP());
Database Migration
XUI allows you to migrate from services with similar database structures.
If you have confirmed your database is compatible with the migration system, you can migrate by restoring your backup to the xui_migrate database and running the build in XUI migration tool.
It’s usually better to do migration on a clean install.. however if you decide to use an existing install, XUI will wipe any tables in your XUI database that it finds data for in your migration database.
When you’re ready to begin, follow these steps (on v1.2.2 onwards):
- Upload your backup database to your XUI server via sftp. You can store it anywhere, for this example we’ll assume /tmp/backup.sql
- Use the tools script to clear the existing migration database and restore your backup: /home/xui/tools migration “/tmp/backup.sql”
- Assuming no errors occured, begin migration: /home/xui/bin/php/bin/php /home/xui/includes/cli/migrate.php
- You will see an ongoing status of what is being migrated, once it has been completed you can log in to your system.
After migration, there may be instances where you may not remember the username and password, or there isn’t a valid access code in place to login to the system. If this happens, use tools to rescue you.
- Generate a rescue access code using: /home/xui/tools access
- Generate a rescue admin user using: /home/xui/tools user
Once you’re logged in, please ensure you change your access code and user account if you have used the rescue tools to enter.
Your load balancers will display as offline, and all streams have been stopped automatically. Your next step is to reinstall the load balancers and start your streams manually once you have confirmed everything has migrated properly. You will also want to check the default XUI settings and set it up to your preference, as well as check the Main Server to ensure the details are correct as you expect them, add any domains or enable SSL if you require it.
If you plan on installing load balancers without reinstalling the operating system on them, please ensure they’re updated to Ubuntu 18.04 at the very least (20.10 preferable) and clear them of any existing systems, uninstall mysql or mariadb and remove any user accounts and incompatible packages such as libcurl3. You will find a tutorial for this on our forum written by another administrator.
HMAC Keys
HMAC keys were integrated into XUI a while ago, but without an explanation as to how it works and what it is for, not many people would be able to successfully implement it.
The idea behind using HMAC is to be able to use your own form of authentication on your website, yet stream from XUI and be able to manage connections accordingly. Instead of using a XUI username and password to authenticate a stream, you can generate a HMAC key with a unique identifier and restrictions that XUI will be able to verify and log.
Firstly, you need to access the XUI Admin panel and generate a HMAC Key.
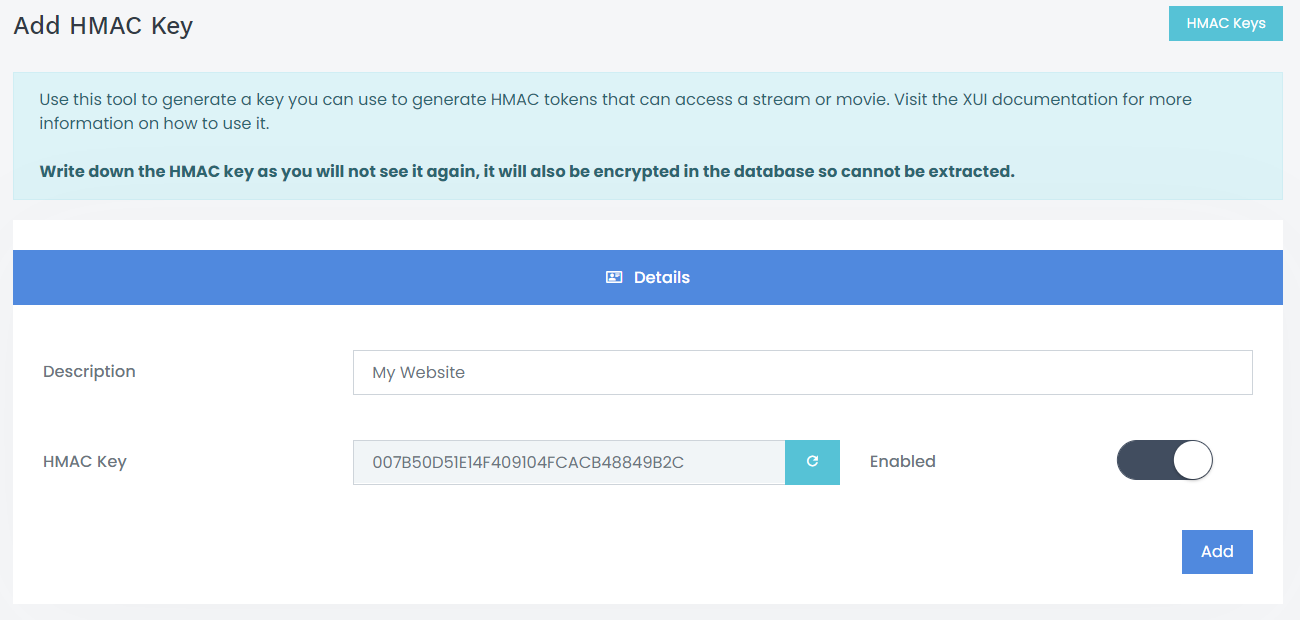
Done! You now have your HMAC Key: 007B50D51E14F409104FCACB48849B2C
You would then need to keep it safe somewhere as you won’t be able to see it again, it’s encrypted in the database.
Token Parameters:
- Stream ID
- Extension
- Max Connections
- Identifier
- Expiration – optional
- User IP – optional
From the above you can build a token as follows:
{StreamID}##{Extension}##{Expiry}##{IP}##{Identifier}##{MaxConnections}
An example being a user you have authenticated on your own system would like to view stream 44, you want restrict them to their IP address and only allow them to view the stream using this URL for 24 hours, with 1 max connection:
44##m3u8##1613771149##192.168.0.1##USER_JOHN_DOE##1
You can then generate a HMAC token using the above string, and the HMAC key you generated earlier. An example in PHP would be:
$rResult = hash_hmac(“sha256”, “44##m3u8##1613771149##192.168.0.1##USER_JOHN_DOE##1”, “007B50D51E14F409104FCACB48849B2C”);
Your HMAC token in this example would be:
ed8d97309bd6cd1add1ef427e0f5cc861204154a4ccf8ddcb119e3441199842a
Finally, build your URL to the stream using your HMAC token and token parameters as follows:
http://yourwebsite.com:8080/stream/auth?stream=44&expiry=1613771149&extension=m3u8&identifier=USER_JOHN_DOE&max=1&ip=192.168.0.1&hmac=ed8d97309bd6cd1add1ef427e0f5cc861204154a4ccf8ddcb119e3441199842a
That’s it! You have a working URL that will expire in 24 hours and be restricted to IP 192.168.0.1, allowing only 1 connection at a time to stream 44 and generating a HLS m3u8 playlist.
Understandably this may seem foreign to a lot of you, however if you’re a developer, this is a secure and easy method to allow external access to your streaming platform without having to set up a new XUI line for each of
XUI Caching System
I’ve always found performance of other platforms to be lacking, knowing full well that the bottleneck is MySQL, it just takes a lot of CPU to open a new connection to MySQL and run queries. This CPU expense is unfortunately exacerbated by the fact that the typical streaming platform has thousands of concurrent connections therefore requiring thousands of new connections to MySQL.
The obvious way around this was to implement a caching system for static data, and a synchronisation system to ensure modified information is then reflected in the cache. This was implemented fairly early in the development of XUI, however has matured significantly since and is now exponentially faster than its initial iteration.
XUI Caching System is enabled by default in more recent versions, relying heavily on a multithreaded Cron that runs in the background. On system start-up, every line, stream, episode and various other pieces of information are extracted from MySQL and stored individually on a file system that utilises system memory for instant access without IO bottlenecks. Due to the memory bound nature, enabling cache on services with significant amounts of streams or lines results in high CPU usage which needs to be accounted for. However, the trade-off of the high memory usage is significantly improved performance across the board.
In terms of setup, very little is necessary. As Caching is enabled by default you can just leave it run as is, however if you see large CPU spikes during caching cron runs you can reduce the Thread Count to ensure less cores and threads are utilised during the generation process.
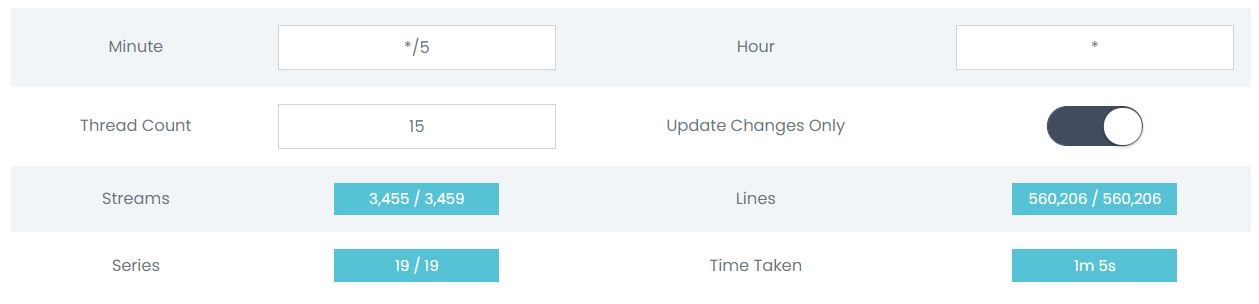
The above shows an example of the Caching system active on a test server. The system compares the amount of generated cache files against the total in the database to ensure the cache is complete and up to date. You’ll see that the Streams in cache is 4 less than in the database, this is due to purposefully broken stream entries in the database designed to ensure that the cache engine doesn’t cache anything that wouldn’t work.
The Minute and Hour variables are in a Cron format, as they are designed to directly amend the Crontab to change the frequency the caching script runs at. The above example runs every 5 minutes of every hour, if you would like a more advanced view of how Cron works you can read the Wikipedia Article relating to it.
The Thread Count variable decides how many threads are utilised when updating the cache, the higher the number, the faster the process, however CPU usage will go up accordingly.
Update Changes Only switch tells the cache system to use timestamps to detect when a Stream or Line has changed versus the currently cached content, selectively updating only the items that the system believes to have changed since the last cron run. Disabling this option will make the entire cache regenerate at each cron run for higher accuracy, you would probably need to adjust the Thread Count and cron timing if you were to go this route, however it is not recommended.
Should I use Caching?
Absolutely.
This is one of the defining factors that sets XUI apart from the competition, and if you compare performance between XUI and other platforms you will see a marked improvement due to Caching as well as other factors such as better, mindful programming with a focus on security as well as performance.